Affinity Photo 2 for iPad Quickstart Guide
Welcome to Affinity Photo 2 for iPad
Upon opening Affinity Photo, you’re greeted with its Home screen. Use the icons on the left to create, open or manage documents.
Tap New and then New Document to create a blank document. When editing a document, return to the Home screen by tapping the button in the workspace’s top-left corner.
Return to documents you’ve created or opened but not closed by tapping Live Docs. Simply tap one’s thumbnail to continue working on it. You can also save and close documents from here.
If you’ve closed a document, tap Open and then Open Document to navigate to and reopen it. Tap Templates to use an existing document as the starting point for a new one.
You can also explore professional Samples and get further Help with your app’s features from the Home screen.
Opening an image
You can open an existing image using the Open button and then navigating to your image in a specified folder.
For image formats such as JPG or TIFF, your image will open in the default Photo Persona. However, for RAW files, you’ll see your image opening in a RAW processing workspace called Develop Persona, which brings us to what Personas are and how they can be used in your creative workflow.
Personas
Personas are Affinity’s unique approach to digital image manipulation workflow. Think of Personas as different digital workspaces where different aspects of photo editing and digital art are addressed.
For the most part, Affinity users spend most of their time in the Photo Persona where the bulk of your core photo-editing tools and features can be accessed.
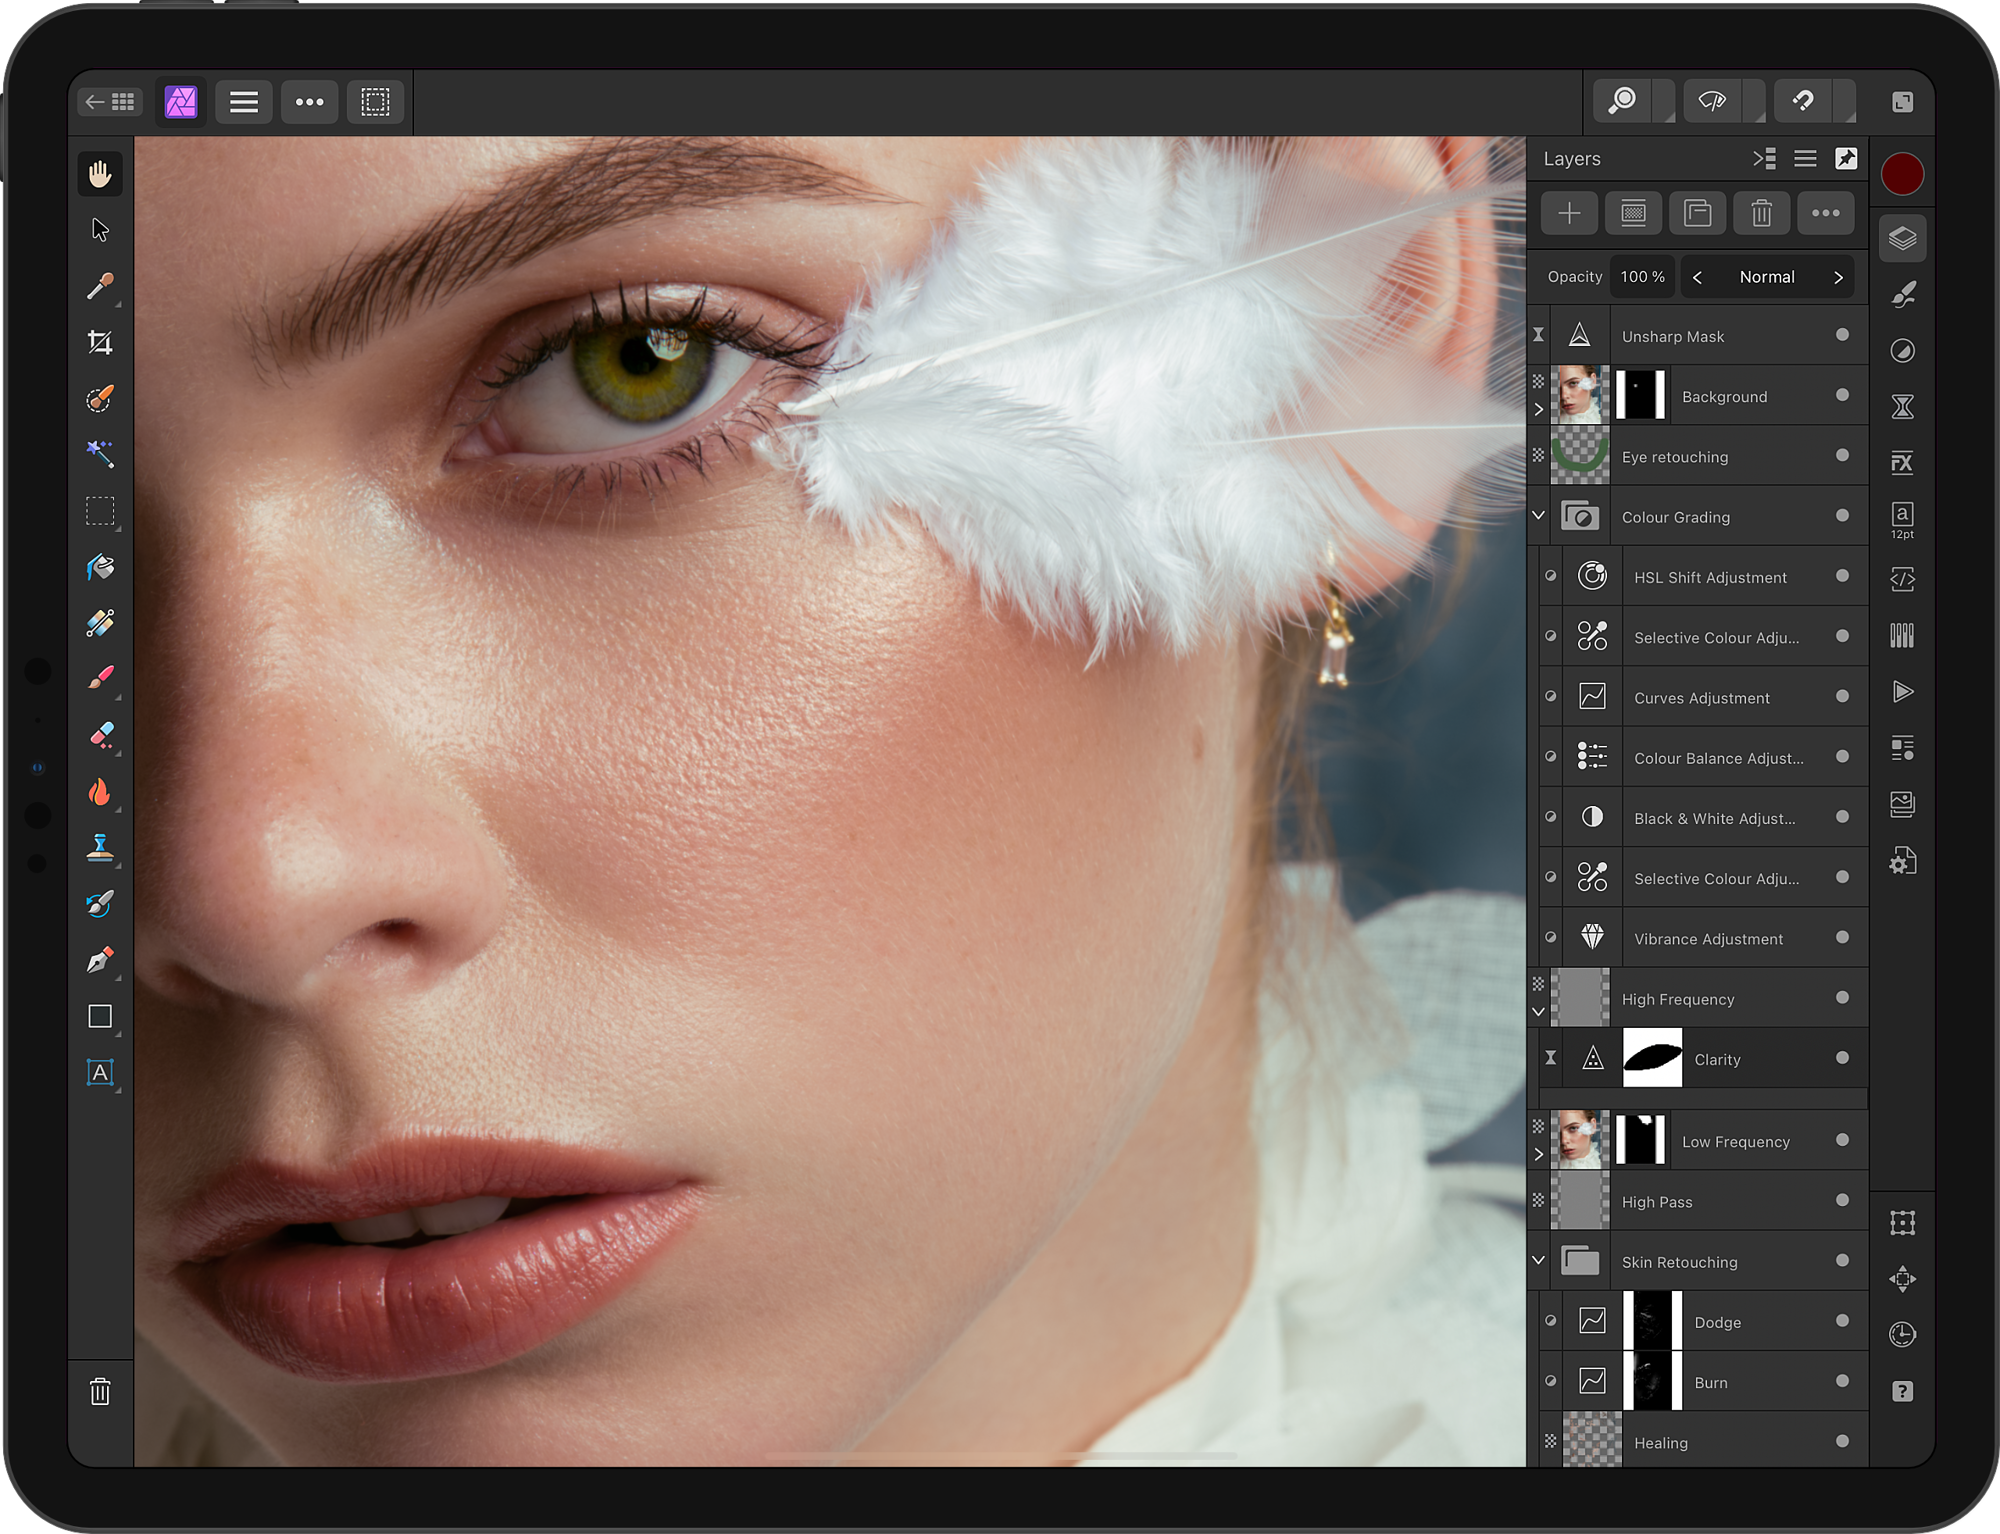
Photo Persona
Here, you’ll find the core photo-editing tools including access to adjustments, layers, brushes, filters as well as other functionality.
The user interface can be perceptually divided into the following main sections:
- The centre area with the main image opened and ready for editing
- The left area hosting the core tools
- The menus at top left: Personas, Document, Edit, Selection
- The context toolbar at the top adjacent to the menus
- Panels on the right, including the Colour, Layers, Brushes, Adjustments and more
Liquify Persona
Liquify Persona focuses on the warping of images. It can be used for subtle face and body reshaping in portrait retouch work or for more extreme image distortions. It offers a studio environment containing a host of warping-specific tools and panels.
Apart from the most commonly used Push Forward Tool and Push Left Tool for warping, you can also find the Freeze Tool here to isolate particular areas for editing. The Thaw Tool, on the other hand, will remove isolated areas once you have finished editing them.
Non-destructive Develop Persona
Develop Persona is launched by default when opening a RAW file. Here, you’re invited to develop the unprocessed RAW image before manipulating it further in the Photo Persona.
Any changes applied through the Persona can be non-destructive and are loaded as a RAW layer. Being non-destructive, you can redevelop at any time.
To do so, ensure to set your layer as RAW Embedded or Linked, which can be done via the option on the context toolbar.
Tone Mapping Persona
Dedicated primarily for 32-bit HDR files, the Tone Mapping Persona is typically used to manipulate either a number of images taken with bracketed exposures or a single image.
This Persona is selected to work on high dynamic range images so they can be shown on a display that has a lower dynamic range.
Workspace
Your workspace is efficient and customisable. Familiar touchscreen gestures are used to interact with the document view and the surrounding interface. For example, you can tap to select an existing object on the page or a tool you want to use, drag to create a new object or position an existing one, and pinch to zoom in or out of the page.
Regularly used commands are always at your fingertips by swiping three fingers down on the document view to reveal the customisable Quick Menu.
Menus at the top left provide access to Personas—modes for different types of task—and common functions such as saving, exporting and layer operations.
To their right is the context toolbar, for quick access to important settings for your current tool or selection. At the far right are menus for zoom level, design aids, preview mode and snapping options.
Studio panels
Panels containing more settings are accessed by tapping their icons on the right. At the top right of each panel, use the pin to determine whether it stays open or automatically closes while you work in the document view.
Manage the front-to-back order, opacity and blend modes of layers on the Layers Panel. You’ll use this panel a lot, so if it’s pinned open, switch to its compact mode to give yourself more room to work on your document.
Tools setup
All the essential tools for creating designs are shown on the left of the workspace. Some are grouped behind a single icon—either that of the first tool or the last-used tool in the group.
In the other Personas, you’ll be offered a different set of tools appropriate to that Persona.
The Command Controller
The Command Controller gives you access to many alternative behaviours for tools and objects. To show or hide it, tap Toggle Command Controller on the Document menu.
Dragging its centre button over one of its four modifier buttons—equivalent to ⌘, Shift, ⌥ and Ctrl on a Mac keyboard—affects actions for as long as it is held there. Or, you can drag to a modifier’s outer edge and then release to lock the modifier on.
For example, you can use the ⌥ (down) modifier with the Pen Tool to draw sharp (cusp) corners; the ⇧ (up) modifier to draw straight brush strokes; and the ⌃ (left) modifier to toggle between selecting objects when the marquee encompasses or intersects them.
Position the controller wherever you want by long-pressing its centre until it pulses and then dragging it.
Cropping and straightening
The Crop Tool draws a rectangular (or square) area on your image that will redefine your new document’s dimensions and discard the area outside the drawn crop area.
Use the tool to manipulate image composition either by using unconstrained or specific built-in aspect ratios (e.g. 4:3) or fixed print sizes (e.g. 6in x 4in).
If needed, straightening a photo is easily performed by selecting Straighten on the context toolbar and then dragging along a line that you consider to be your new horizon.
Removing unwanted content
The Inpainting Brush Tool is frequently used by portrait photographers to remove skin blemishes or by landscape photographers to clear unwanted objects such as power lines.
The tool is non-destructive—you can remove content by painting with it on a separate layer that targets the unaltered image layer below. To do so, select Current Layer & Below on the tool’s context toolbar before inpainting.
Masking
For compositing work, masking allows you to make visible only a part of an image, pixel layer or adjustment. You can create masks from pixel selections or by painting in/out content on a mask layer using greyscale raster brushes.
Masks can also be:
- created from channels
- created from luminosity
- created as live masks to target hue, luminosity or frequency (band-pass)
- compound masks (multiple masks combined using Boolean operations such as Add and Subtract)
- inverted
- grouped
- isolated
- switched on or off according to their state
Masking using pixel selections
For image cutouts
Making selections can be one of the most demanding parts of image editing. However, using the Smart Selection Brush Tool or Flood Select Tool, you’ll be able to precisely cut out a subject from its background.
For separating complex edges (e.g., hair, fur) from backgrounds you can refine the selection.
For applying adjustment/filters to specific image areas
After making your pixel selection and applying an adjustment or filter to it, you immediately restrict its effect to just that selection area.
Mask layers for painting in/out image areas
A classic compositing technique is to paint a placed composite image back into a scene by using a mask layer.
You can create a new empty mask layer by tapping on the + symbol, then selecting Empty Mask Layer on the Layers Panel. This lets you mask the previously selected target layer by painting on the mask in levels of greyscale to reveal or hide content (white to fully reveal, black to completely conceal).
Layers
The Layers Panel lets you arrange content into separate layers in a layer stack. In doing so you can selectively control content visibility, group content, apply adjustments and filters, as well as apply layer properties such as opacity, blend modes and blend ranges.
The types of layers that can be created are:
- Pixel Layer
- Fill Layer
- Pattern Layer
- Pattern Layer from Selection
- Mask Layer
- Empty Mask Layer
- Compound Mask Layer
- Hue Live Mask Layer
- Luminosity Live Mask Layer
- Bandpass Live Mask Layer
- Empty Group
Opacity
The Opacity setting on the Layers Panel lets you adjust how visible the layer is.
Blend Modes
There is a comprehensive number of blend modes available in Affinity Photo and they are a powerful feature to control how pixel colour and tone are blended together across layers.
You can access blend modes directly on the Layers Panel, adjacent to the Opacity setting. As you cycle through them, they preview in realtime, giving you an instant feedback on what the current layer looks like with them applied.
Blend Ranges
Blend ranges are Affinity Photo’s version of Adobe’s Blend If set of tools. They give you full tonal control over blending using two graphs that define how the current source layer’s tones blend with those of underlying layers.
You can access blend range options by tapping Layer Options (ellipsis) on the Layers Panel. The blend range graphs are then accessible at the bottom of the panel.
Brushes
Affinity Photo comes packed with a multitude of brushes in the Brushes Panel. Additionally, custom brushes can be imported, created and saved for future use. The Affinity apps have a native .afbrushes brush format but will also import .abr brush files including those with dynamics.
Each brush can be modified by swiping left on a brush entry on the panel.
As you paint brush strokes, alter brush width and hardness on the fly by dragging outwards from the Command Controller’s centre button to the space between the ⌃ and ⌥ buttons. The buttons will highlight in blue when you do so. Whilst having them pressed, drag up/down to change on-screen the hardness of your selected brush or left/right to modify its width.
Adjustments
Adjustments can be applied non-destructively to your photo for creative or corrective purposes. They are independent non-destructive layers, meaning you can modify their settings at any time without affecting your layer content.
Typically, tonal adjustments such as Brightness/Contrast, Curves or Levels are used, while colour adjustments like HSL and Recolour are popular; the Black and White adjustment can be used creatively.
Any adjustment layer has self-masking properties, meaning that pixel selections are converted to masks on adjustment layer creation. Alternatively, you can paint in greyscale directly on the adjustment layer.
Adjustments can be accessed from the Adjustments Panel; they are also available on various other panels within the Develop Persona.
Live Filters
Live Filters include blur, sharpen, distortion, noise and edge filters for more creative photo editing. Like adjustment layers, all filter layers are independent non-destructive layers that have self-masking properties.
By default, you will be presented with all filters available via the Filters Panel. To include live filters, toggle Add Live Filters on the top right.
Focus Stacking
Incredibly sharp looking outcomes are often produced by taking a series of photos of different focal points within the scene, then merged together into one. After developing and preparing your RAW files in the Develop Persona and saving them, you can combine them into one by going to the Home screen, choosing New, then selecting New Focus Merge.
The rendered file will be combined into one final and sharper photo.
Panorama Stitching
Affinity Photo’s built-in Panorama Stitching feature comes packed with powerful options to merge photos seamlessly and create a wider scene.
On Affinity’s Home screen, tap New and then New Panorama to select images for stitching.
High Dynamic Range (HDR)
Like panoramas, you can merge images shot at different exposure levels taking into account shadows, midtones and highlights. The combined output will produce an HDR image with an extensive tonal range which would otherwise be impossible due to the limits of a digital camera.
On Affinity’s Home screen, tap New and then New HDR Merge.
Exporting to different formats
To export your project, select Export from the Document menu. The dialog that appears lets you export:
- The whole document
- Selection area (all layers within the selection bounding box)
- Selection only (the current layer within its selection bounding box, including any transparent regions)
Alternatively, you can use the Export Persona, which takes a slice-based approach to the simultaneous mass export of drawn slices or selected layers. The former is possible by using the Slice Tool which allows you to export any drawn rectangular area and is great for banners, on-the-fly crops, and more.
See also
For more in-depth learning resources don’t miss:
Credits & Footnotes
- Twr Mawr Lighthouse, UK by Colin Ward on Shutterstock (Cropping)
- White horses, Camargue, France by Ventdusud on Shutterstock (Straightening)
- Orange lighthouse, Northern Iceland by Code to Nowhere on Shutterstock (Removing unwanted content)
- Jazz band performs at the club by Roman Voloshyn on Shutterstock (Blend modes)
- Mother of Millions by Steven Randolph (Focus Stacking)
- Road To Paradise by Timothy Poulton (Panorama Stitching)
- Dolphins in the Sky by Anil Saxena (Exporting to different formats)