Affinity Photo 2 (Desktop) Quickstart Guide
Creating a new document
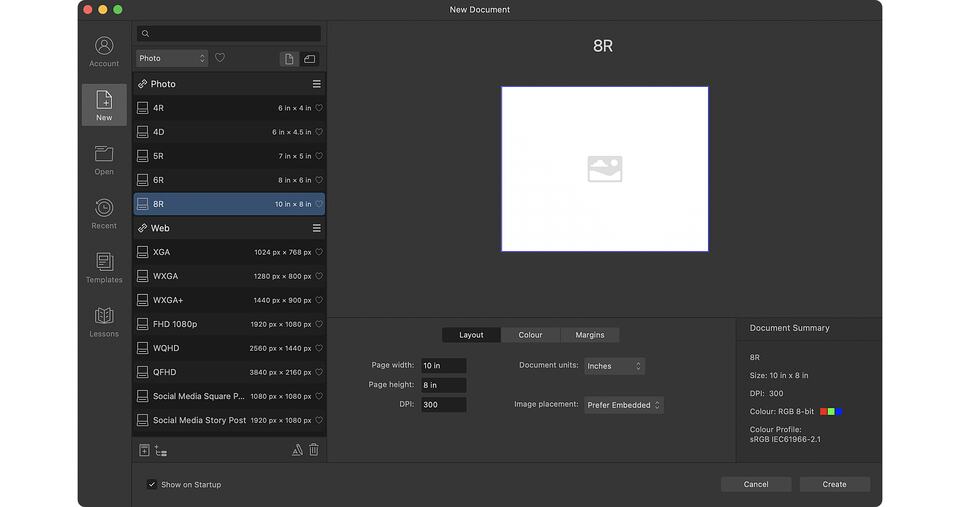
When first launching the app, you’ll be presented with a New Document dialog. Here you can select from many presets to set up your document easily, specify your own and even create a category for your projects.
What you can set is:
- The type of a document (for print, press ready, photo, web, and more)
- Page size and orientation
- Layout, color and margin settings
This approach is perfect for digital artists with a composite project in mind, where photography can be merged with creative design.
Opening an image
The New Document dialog lets you open an existing image using the Open button. You can also open files:
- by dragging the file from a folder onto the Affinity Photo app’s icon
- by clicking File>Open and then navigating to your image in a specified folder
For image formats such as JPG or TIFF, your image will open in the default Photo Persona. Instead, for raw files, you’ll see your image opening in a raw processing workspace called Develop Persona, which brings us to what Personas are and how they can be used in your creative workflow.
Personas
Personas are Affinity’s unique approach to digital image manipulation workflow. Think of Personas as different digital workspaces where different aspects of photo editing are addressed.
For the most part, Affinity users spend most of their time in the Photo Persona where the bulk of your core photo-editing tools and features can be accessed.
Non-destructive Develop Persona
Develop Persona is launched by default when opening a raw file. Here, you’re invited to develop the unprocessed raw image before manipulating it further in the Photo Persona.
Any changes applied through the Persona are non-destructive and are loaded as a RAW layer if the Persona’s RAW Layer (Embedded) or RAW Layer (Linked) output option is selected on the context toolbar. Being non-destructive, you can get back to the Develop Persona by double-clicking on the RAW layer’s thumbnail.
You can load any valid pixel layer into Develop Persona at any time by swapping to the Persona.
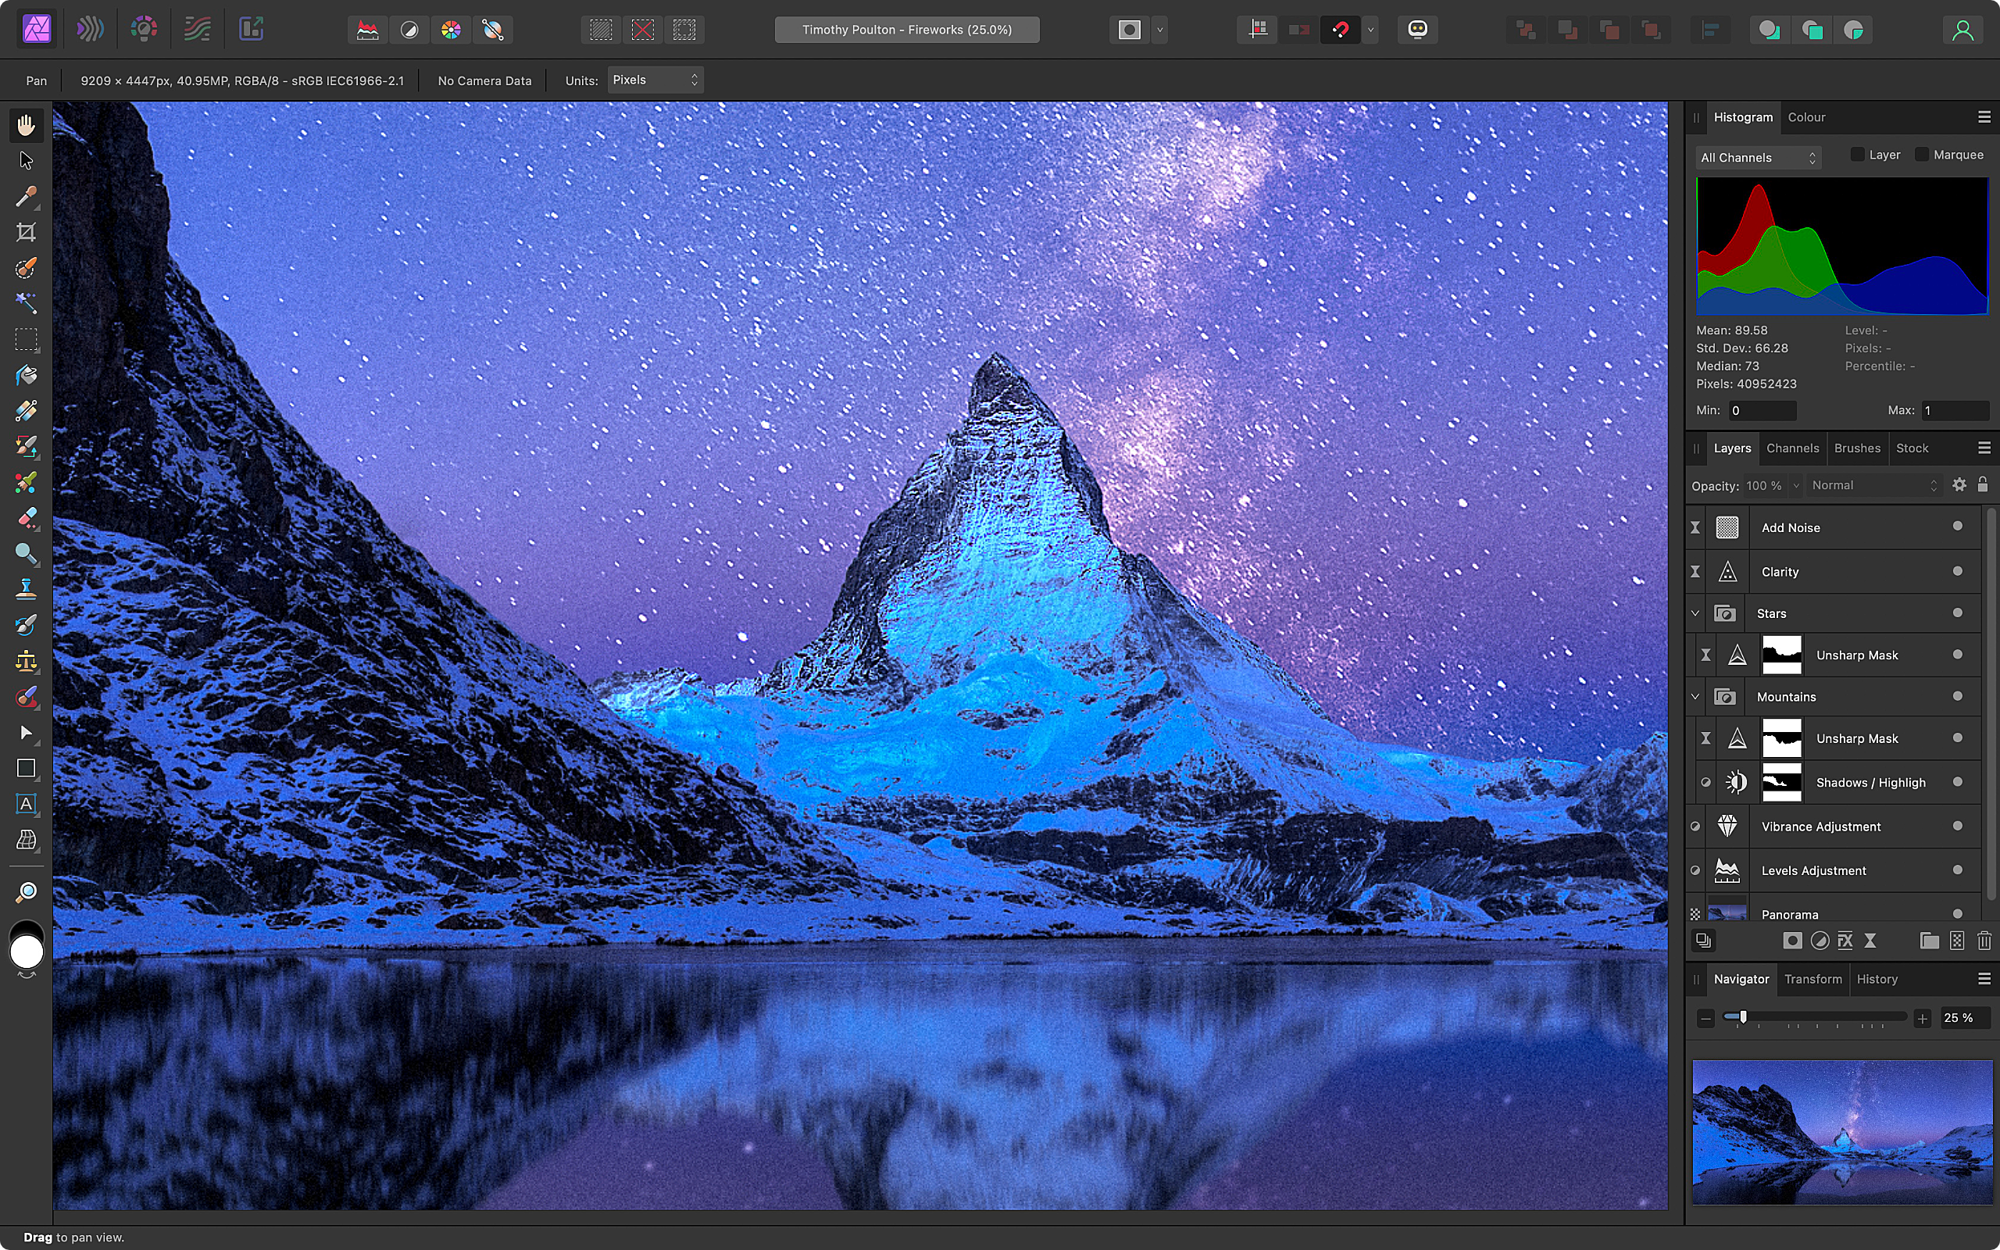
Photo Persona
Here, you’ll find the core photo-editing tools including access to adjustments, layers, brushes, filters as well as other functionality.
The user interface can be perceptually divided into the following main sections:
- The center area with the main image opened and ready for editing
- The left area hosting the Tools
- The Toolbar at the top
- Up to 10 essential panels at right, including the Color, Histogram and Layers panels
Liquify Persona
Liquify Persona focuses on the warping of images. It can be used for subtle face and body reshaping in portrait retouch work or for more extreme image distortions. It offers a studio environment containing a host of warping-specific tools and panels.
Apart from the most commonly used Liquify Push Forward Tool and the Liquify Twirl Tool for warping, you can also find the Freeze Tool here to isolate particular areas for editing. The Thaw Tool, on the other hand, will remove isolated areas once you have finished editing them.
Tone Mapping Persona
Dedicated primarily for 32-bit HDR files, the Tone Mapping Persona is typically used to manipulate either a number of images taken with bracketed exposures or a single image.
This Persona is selected to work on high dynamic range images so they can be shown on a display that has a lower dynamic range.
Workspace
All the familiar and essential tools are found on the left-hand side of the screen and can be accessed using a familiar set of keyboard shortcuts—listed below next to the tool’s name.
Photo Persona tools
Some tools are concealed within flyouts; to expand, simply click and hold on the tool’s icon to reveal extra tools.
Press a tool’s letter key to select the tool. Hold a tool’s letter key to use the tool temporarily. Release the key to switch back to the previous tool.
In the other Personas, you’ll be offered a different set of tools appropriate to that Persona.
The top Toolbar offers commonly used tools and options, including automatic settings, selection and masking controls, as well as snapping, alignment and Affinity account access.
Studio panels
Studio panels (like windows) support your design tools, help to manage your project and offer design aids. A core set of panels are displayed by default to the right of your workspace, while the Window menu lets you switch on or off a full set of panels individually.
Cropping and straightening
The Crop Tool draws a rectangular (or square) area on your image that will redefine your new document’s dimensions and discard the area outside the drawn crop area.
Use the tool to manipulate image composition either by using unconstrained or specific built-in aspect ratios (e.g. 4:3) or fixed print sizes (e.g. 6in x 4in).
If needed, straightening a photo is easily performed by selecting Straighten on the context toolbar and then dragging along a line that you consider to be your new horizon.
Removing unwanted content
The Inpainting Brush Tool is frequently used by portrait photographers to remove skin blemishes or by landscape photographers to clear unwanted objects such as power lines.
The tool is non-destructive—you can remove content by painting with it on a separate layer that targets the unaltered image layer below. To do so, select Current Layer & Below on the tool’s context toolbar before inpainting.
Masking
For compositing work, masking allows you to make visible only a part of an image, pixel layer or adjustment. You can create masks from pixel selections or by painting in/out content on a mask layer using grayscale raster brushes.
Masks can also be:
- created from channels
- created from luminosity
- created as live masks to target hue, luminosity or frequency (band-pass)
- compound masks (multiple masks combined using Boolean operations such as Add and Subtract)
- inverted
- grouped
- isolated
Masking using pixel selections
For image cutouts
Making selections can be one of the most demanding parts of image editing. However, using the Selection Brush Tool or Flood Select Tool, you’ll be able to precisely cut out a subject from its background.
To mask, click Mask Layer on the Layers Panel.
For separating complex edges (e.g., hair, fur) from backgrounds you can refine the selection.
For applying adjustment/filters to specific image areas
After making your pixel selection and applying an adjustment or filter to it, you immediately restrict its effect to just that selection area.
Mask layers for painting in/out image areas
A classic compositing technique is to paint a placed composite image back into a scene by using a mask layer.
You can create a new Empty Mask layer by clicking Mask Layer whilst pressing ⌥ (on Mac) or Alt (on Windows) on the Layers Panel. By dragging the empty mask layer onto the target layer’s thumbnail, you can mask just that target layer by painting on the mask in levels of grayscale to reveal or hide content (white to reveal, black to conceal).
Layers
The Layers Panel lets you arrange content into separate layers in a layer stack. In doing so you can selectively control content visibility, group content, apply adjustments and filters, as well as apply layer properties such as opacity, blend modes and blend ranges.
Opacity
The Opacity setting on the Layers Panel lets you adjust how visible the layer is.
The opacity level can be also controlled with keyboard shortcuts using the numeric keys 1 to 9. These are set in 10% increments, from 10% to 90%.
Blend modes
There is a comprehensive number of blend modes available in Affinity Photo (the example shows the most commonly used) and they are a powerful feature to control how pixel color and tone are blended together across layers.
You can access blend modes via a pop-up menu at the top of the Layers Panel. As you cycle through the menu items, they preview in realtime, giving you an instant feedback on what the current layer looks like with them applied.
Blend ranges
Blend ranges are Affinity Photo’s version of Adobe’s Blend If set of tools. They give you full tonal control over blending using two graphs that define how the current source layer’s tones blend with those of underlying layers.
You can access blend ranges by clicking the cog-shaped Blend Options icon on the Layers Panel.
Brushes
Affinity Photo comes packed with a multitude of brushes in a number of categories. Additionally, custom brushes can be imported and created and saved for future use. The Affinity apps have a native .afbrushes brush format but will also import .abr brush files including those with dynamics.
Each brush can be edited by double-clicking on a brush in the Brushes Panel. A quick and powerful way to work with brushes is to use keyboard shortcuts combined with either a mouse, trackpad or stylus gestures as they allow for a speedy and arguably more comfortable workflow.
Try the following to alter brush width and hardness on the fly:
- On Mac, use the Ctrl+⌥ keys with clicking and dragging up/down or left/right respectively.
- On Windows, the modifier is Ctrl+Alt with clicking and dragging up/down or left/right respectively.
Adjustments
Adjustments can be applied non-destructively to your photo for creative or corrective purposes. They are independent non-destructive layers, meaning you can modify their settings at any time without affecting your layer content.
Typically, tonal adjustments such as Brightness/Contrast, Curves (below) or Levels are used, while color adjustments like HSL and Recolor are popular; the Black and White adjustment (below) can be used creatively.
Any adjustment layer has self-masking properties, meaning that pixel selections are converted to masks on adjustment layer creation or you can paint in grayscale directly on the adjustment layer.
Adjustments can be accessed from your Layers Panel or via the Adjustments Panel (if switched on via the Window menu); they are also available on various panels in the Develop Persona.
Live filters
Live Filters include blur, sharpen, distortion, noise and edge filters for more creative photo editing. Like adjustment layers, all filter layers are independent non-destructive layers that have self-masking properties.
Focus stacking
Incredibly sharp looking outcomes are often produced by taking a series of photos of different focal points within the scene, then merged together into one. After developing and preparing your raw files in the Develop Persona and saving them, you can combine the images into one by going to File>New Focus Merge.
The rendered file will be combined into one final and sharper photo.
Panorama stitching
Affinity Photo’s built-in panorama stitching feature comes packed with powerful options to merge photos seamlessly and create a wider scene.
Go to File>New Panorama to select images for stitching.
High Dynamic Range (HDR)
Like panoramas, you can merge images shot at different exposure levels taking into account shadows, midtones and highlights. The combined output will produce an HDR image with an extensive tonal range which would otherwise be impossible due to the limits of a digital camera.
To merge images into a HDR output, use File>New HDR Merge.
Exporting to different formats
There are various ways to export your documents and a multitude of formats available to choose from. The easiest way to export is by using File>Export, where the dialog lets you export:
- The whole document
- Selection area (all layers within the selection bounding box)
- Selection only (the current layer within its selection bounding box, including any transparent regions)
Alternatively, you can use the Export Persona, which takes a slice-based approach to the simultaneous mass export of drawn slices or selected layers. The former is possible by using the Slice Tool which allows you to export any drawn rectangular area and is great for banners, on-the-fly crops, and more.
See also
For more in-depth learning resources don’t miss:
Credits & Footnotes
- Fireworks by Timothy Poulton (User interface)
- Whitby scene by Mike Leski (Develop Persona)
- Ogwen Valley by This Expansive Adventure (Photo Persona)
- 3D geometric object by Physics on Shutterstock (Liquify Persona)
- Rain in the Tropics by Elena Paraskeva (Tone Mapping Persona)
- Twr Mawr Lighthouse, UK by Colin Ward on Shutterstock (Cropping)
- White horses, Camargue, France by Ventdusud on Shutterstock (Straightening)
- Orange lighthouse, Northern Iceland by Code to Nowhere on Shutterstock (Removing unwanted content)
- Portrait of beautiful afro-american woman by santypan on Shutterstock (Masking using pixel selections - image cutouts)
- Cool hipster student woman wearing eyewear glasses by Elena Kharichkina on Shutterstock (Masking using pixel selections - adjustments)
- The Machrie Moor standing stones on Arran by Mark David Williams on Shutterstock (Mask layers for painting)
- Burana landscape, Kyrgyzstan tower by Halit Omer on Shutterstock (Mask layers for painting)
- Jazz band performs at the club by Roman Voloshyn on Shutterstock (Blend modes)
- Black particles explosion isolated on white background by sergio34 on Shutterstock (Blend ranges)
- White smoke on the black background by ANAID studio on Shutterstock (Blend ranges)
- Spark Drink by Frankentoon (Brushes)
- Violin in the Desert by Elena Paraskeva (Adjustments)
- Wolfhound in front of white background by Firma on Shutterstock (Curves)
- Old Farmhouse at Sunset on the Great Plains by Scott Book on Shutterstock (Adjustments)
- Generic red sports car by ParabolStudio on Shutterstock (Live filters)
- Mother of Millions by Steven Randolph (Focus stacking)
- Road To Paradise by Timothy Poulton (Panorama stitching)
- Swans and Ducks by Adam McBean (High Dynamic Range)
- Dolphins in the Sky by Anil Saxena (Exporting to different formats)